 Name: Incom T-65B X-wing
Type: Space superiority fighter
Scale: Starfighter
Length: 12.5 meters
Skill: Starfighter piloting: X-wing
Crew: 1 and astromech droid (can coordinate)
Crew Skill: Starfighter piloting 5D, starship gunnery 4D+2, starship shields 3D
Cargo Capacity: 110 kilograms
Consumables: 1 week
Cost: 150,000 (new)
Hyperdrive Multiplier: x1
Nav Computer: Uses astromech droid programmed with 10 jumps
Maneuverability: 3D
Space: 8
Atmosphere: 365; 1,050 kmh
Hull: 4D
Shields: 1D
Sensors:
Passive: 25/OD
Scan: 50/1D
Search: 75/2D
Focus: 3/4D
Weapons:
4 Laser Cannons (fire-linked)
Fire Arc: Front
Skill: Starship gunnery
Fire Control: 3D
Space flange: 1-3/12/25
Atmosphere Range: 100-300/1.2/2.5 km
Damage: 6D
2 Proton Torpedo Launchers (8 Torpedo Magazine)
Fire Arc: Front
Skill: Starship gunnery
Fire Control: 2D
Space Range: 1/3/7
Atmosphere Range: 30-100/300/700
Damage: 9D
Components
Weapons: {replaces the above energy weapon}
Standard Taim & Bak KX8 Laser Cannon: A well balanced weapon with good range. {as above}
Czerka Burst Cannon: Burst cannons, as their name suggests, fire in 3-shot bursts. They lose less damage over longer ranges, making them more reliable over distance. Their general damage per minute, however, remain identical to the standard. Burst cannons are unique to the fighter class. {Space: 1-5/15/32, Atmosphere Range: 100-500/1.5/3.2km}
Czerka Guided Burst Cannon: The guided burst cannon is identical to its non-guided counterpart, but features a lot of aim assist. This comes at a considerable damage reduction, making the guided burst cannon roughly beneath standard lasers in damage. This can prove helpful in engaging interceptors, which are hard to pin down. It otherwise has only situational uses. Guided burst cannons are unique to the fighter class. {Space: 1-5/15/32, Atmosphere Range: 100-500/1.5/3.2km, Fire Control: 3D, Damage: 5D}
Krupx JR-89 Ion Cannon: Ion cannons are not often used on X-wings, as most Imperial craft lack shielding. TIE Reapers, which are the only craft that do, can easily be handled by standard weapons. {Damage: 5D Ion Damage}
Plasburst Laser Cannon: Plasburst weapons are rarely seen due to their low rate of fire and slow charge time. Plasburst lasers also are the only short range weapon on the X-wing, {Space: 1-2/6/12., Atmosphere Range: 100-150/600/1.2km, Damage: 7D, Rate of Fire: 1}
Countermeasures: {Elite Pilots can choose to equip their fighter with one of the below}
ArMek HM Seeker Warheads: Seeker Warheads, or sometimes called "flares", are the most common and flexible anti-missile countermeasure. TIE Fighters are often found turning and manoeuvring, making chaff less useful, and the sensor jammer only has a single use. {When used reduces enemy skill to attack the fighter with Missiles by 3D}
Particle Burst: The Particle Burst is not often used on the X-wing, as in order for it to reach maximum effectiveness, enemy missiles must fly through the static cloud. This cloud can be used to cover capital ships on occasion, but flares are the more popular choice. {When used creates a cloud behind the fighter which reduces all skill with missiles by 3D, but only for weapons fires through the cloud}
Melihat Sensor Jammer: The sensor jammer's short 4 second duration and single use make it not often used. Its biggest benefit is being able to shake missiles at any rate and from any direction. {A single use system, which stops any missile from hitting the fighter}
Auxiliary: {replaces the above Proton Torpedo weapon with two (left and right) Auxiliary systems}
Krupx MG5 Concussion Missile: Concussion missiles are no-frills missiles that simply lock onto and destroy their target. Like other missiles, it can be fired without a lock, usually against a target too slow to dodge it. Concussion missiles hit hard and have decent tracking, but lack the power to be used against capital ships on a regular basis. {Skill: Starship gunnery; Concussion Missile, Fire Control: 3D, Damage:7D, Ammo: 4 Missiles}
Krupx MG7-A Proton Torpedo: Standard Proton Torpedo, as X-Wings are normally equipped with. {as above but 4 Torpedo Magazine}
Gyrhil EP Ion Missile: Ion missiles are designed to be used against starfighters, and have half the lock-on time of concussion missiles. They cause minimal damage upon hits, but are strong against shielding. {Skill: Starship gunnery: Ion Missile, Fire Control: 3D, Space Range: 1/3/7, Atmospheric Range: 50-100/300/700m, Damage: 5D Ion Damage, Ammo: 4 Missiles}
Krupx Ion Torpedo: Ion torpedoes are much like proton torpedoes in that they are designed to be launched from standoff ranges against capital ships. Ion torpedoes are very dangerous - one can eliminate the shields of a frigate or corvette, and two can knock out the shields of the enemy capital ship. {Skill: Starship Gunnery: Ion Torpedo, Scale: Capital, Fire Control: 1D, Space Range: 1/3/7, Atmospheric Range: 50-100/300/700m, Damage: 3D Ion Damage, Rate of Fire: 1, Ammo: 4 Torpedos}
ArMek Barrage Rockets: Rockets hit hard, but their unguided nature makes it hard to catch mobile enemies with them. Individual rockets don't cause a lot of damage - fire them in large volleys to make the damage stack up against both shielded and unshielded targets. {Skill: Starship Gunnery: ArMek Barrage Rockets, Fire Control: 0D, Space Range: 1/3/7, Atmospheric Range: 50-100/300/700m, Damage: 8D, Ammo: 8 missiles}
Chempat Emergency Assault Shield: The Assault Shield, when activated, puts up a shield in front of you that blocks a large percentage of damage. It only lasts 3 seconds and sharply reduces your turning ability when active. It is best used therefore in head-on attacks against enemy players, or as additional protection when attacking an enemy capital ship. {a Single Use Force Shield, which provides adds 4D to shields for 1 round}
Kryotech Emergency Repair Droid: The repair droid, when activated, will repair your ship. It has unlimited uses, but has a lengthy cooldown of 30 seconds. {A secondary repair droid which can repair the fighter in flight or coordinate with the Astromech, has a Starfighter Repair skill of 5D}
Krupx EM4 Ion Rockets: Ion Rockets function identically to Onslaught Rockets, but carry an ion payload instead. This makes them effective against all New Republic craft, particularly against capital ships. Ion rockets travel with half the speed of standard rockets, making them more of an anti-capital ship weapon than an anti-fighter one. {Skill: Starship Gunnery; Ion Rockets, Fire Control: 0D, Space Range: 1/3/7, Atmospheric Range: 50-100/300/700m, Damage: 6D Ion Damage, Ammo: 8 missiles}
Incom Boost Extension Kit: When triggered, this component gives you a full boost charge. Utilize this component to aid in advanced drifting techniques, allowing you to maintain offence and mobility simultaneously. {Requiring a 3 round cool down, this unit increases speed by +3, and Manoeuvrability by +2D}
Krupx Prototype Piercing Torpedo: Piercing Torpedoes are used exclusively against flagship subsystems. While they cause minimal damage to the hull of the target flagship, they are unique in their ability to ignore shielding. They are most often used against shield generators to allow for easier subsequent attacks. {Skill: Starship Gunnery: Piercing Torpedo, Fire Control: 0D, Scale: Capital, Space Range: 1/3/7, Atmospheric Range: 50-100/300/700m, Damage: 3D (ignores shields), Rate of Fire: 1, Ammo: 4 Torpedos}
Hull: {One of the below may be selected for specific missions}
Incom Ferroceramic Hull: The standard hull, with no strengths or weaknesses. {as above}
Fabritech Dampener Hull: Increases the amount of time an enemy needs to lock onto you. It is a situational upgrade for fighters, dependent on how often missiles lock onto you. {-1D to enemy Fire Control for Missiles}
Slayn & Korpil Laminasteel Hull: Reduces incoming missile damage, but increases incoming laser damage. Missiles in general are much rarer to find than lasers, making this a situational upgrade at best. {-1D to hull vs Energy Weapons, +2D to hull vs Missile Weapons}
Slipstream Light Hull: Equip to receive a reduction in maximum health, but receiving improvements to manoeuvrability and acceleration. Fairly useful for brawling and turning fights, though the most powerful technique to use in turning fights is microboosts, not traditional turns. The light hull does not offer any benefits to maximum speed, so this part alone will not help you make hit and run attacks. {-1D to Hull, +2D to Manoeuvrability}
Carbanti Reflec Hull: Equipping this on an X-wing helps with approaching enemies from odd angles, with a moderate health reduction. The health reduction still makes you have more health than a stock A-wing, but the X-wing will always lack the A-wing's speed. Avoid head-on attacks, and stay close to the edges of the battle. Combine with Ion Torpedoes and Proton Torpedoes to sneak close to a Star Destroyer and cause heavy damage before being spotted. {-1 to Hull, +3D to difficulty to detect the Fighter on Sensors}
Koensayr Reinforced Hull: Equipping this makes your X-wing behave more like a Y-wing - having increased durability at the expense of acceleration and manoeuvrability. This does not decrease your maximum speed, however, so you can potentially use this hull to make gun runs against the enemy capital ship's turrets. Avoid turning fights at all costs with this hull. {+2D to Hull, -1D Manoeuvrability, -2 Speed}
Chempat Deflector Hull: The deflector hull places more emphasis on your shields rather than your health. {-1D Hull, +2D Shields}
Engines: {One of the below may be selected for specific missions}
Incom Sublight Engine: The standard sublight engine with no benefits or drawbacks. {as above}
Unstable Sublight Engine: This engine makes you lose a moderate amount of both health, but offers greatly increased acceleration and speed. What really makes this engine stand out, however, is the large explosion you create when you are shot down. Some pilots use this explosion as an anti-capital ship weapon, hoping to take out the capital ship's turrets when they die. {-1D Hull, +2 Speed, +1D Manoeuvrability, 7D Explosion when destroyed}
Koensayr Microthrust Engine: Use the Microthrust Engine for close-quarters brawling. You lose a notable amount of maximum speed and acceleration, but gain it back in mobility. {-1 Speed, +1D Manoeuvrability}
Quadex Propulsion Engine: The propulsion engine makes you start and stop quicker by a significant margin, at the cost of a small loss in manoeuvrability. {+1 Speed, -1D Manoeuvrability}
Quadex Jet Engine: This engine greatly increases the rate at which you generate boost power, but also greatly increases the rate at which you consume it. This engine is mostly designed for drifting, as it performs very poorly when boosting in straight lines. {Requiring a 3 round cool down, this engine can provide a boost, increasing speed by +2, and Manoeuvrability by +1D}
Koensayr Thrust Engine: This engine greatly increases maximum speed, but reduces acceleration and manoeuvrability. Use this to make quick attack runs on enemy capital ships, or using boom and zoom tactics. {+3 Speed, -2D Manoeuvrability}
Incom SLAM Engine: The SLAM (Sublight Acceleration Motor) engine automatically produces boost power regardless of whether there is maximum power in the engines or not, at the cost of maximum speed. in. {This diverts power to the other systems of the Tie Fighter, +1D damage to the Energy Weapons or Shields, at the expense of -2 Speed and -1D Manoeuvrability}
Shields: {One of the below may be selected for specific missions}
Standard Incom Deflector Shield: This shield offers no benefits or drawbacks. {as above}
Sirplex Nimble Deflector: Increases shield regeneration, but decreases shield capacity. This shield is good for hit and run attacks - hit the enemy quickly and then leave the battle to let your shields recharge before going in again. {2D of back-up shields. When a die of shield is lost, if the pilot can make an Easy starship shields total, one of the back-up die codes of shields can be brought up to restore the shields}
Gyrhil Resonant Shield: Reduces your maximum shield capacity, but overcharges your lasers automatically when your shields are maxed out. The shield also does not decay when you switch power away from them. Using this shield lets you freely charge boost power, and when combined with the SLAM engine, vastly simplifies power management at the cost of performance. {The pilot may divert power from Shields to Weapons, dropping Shields by 1D, but increasing Energy Weapon damage by 1D)
Fabritech Scrambler Shield: An alternative to the Dampener Hull, the scrambler shield offers even longer lock times than the dampener hull, but it is only effective when your shields are at 100, so any shield damage, or diverted power from shields removes the scrambling effect. {-2D to enemy Fire Control for Missiles}
Chempat Fortified Deflector: The Fortified Shield offers a bonus to shield capacity at the cost of shield regeneration. This shield is best used when taking heavy fire to attack a capital ship. {adds +1D to shields, however when the fighter takes any damage at all, this bonus is lost}
Krupx Conversion Shield: When the conversion shield is depleted, this shield takes all your weapon power and dumps it into a brief but impenetrable barrier. With no weapon power, you are effectively a sitting duck, but it can give you time to temporarily withdraw from battle to make it to safety. {The Pilot may divert all Weapon energy to add +4D to shields for one round. Weapons recover at 1D damage per round as they recharge}
Loronoar Ray Shield: This shield falls quickly to missiles, but takes less damage than normal from lasers. The biggest threat to this shield are the Onslaught Rockets used by TIE Interceptors and TIE Fighters. {-1D to shields vs Missile Weapons, +1D to shields vs Energy Wepaons}
Overloaded Shield: The overloaded shield offers a lot of defence, reducing incoming damage while still having a good capacity. {+2D to shields, however if the vessel takes any damage, the shields drop completely}
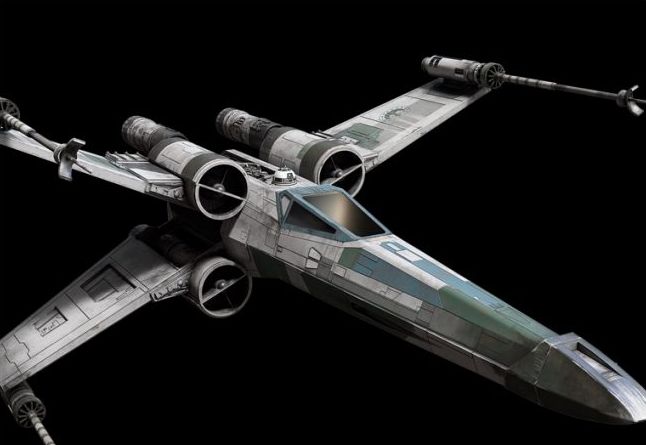
Description: As the backbone starfighter of the Rebel fleet, the T-65B X-wing is an all-purpose starfighter that can deftly strike down enemy TIEs as well as capital ships
X-wing starfighters were a type of starfighter marked by their distinctive S-foils that resembled the High Galactic script's character "X" in attack formation. They were heavily armed with four laser cannons on the S-foils and proton torpedo launchers in the fuselage. X-wings were designed for dogfighting and long missions. During the Galactic Civil War, the Rebel Alliance used T-65B X-wing starfighters and T-65C-A2 X-wings in many battles, including the Battle of Yavin and the Battle of Endor.
Approximately thirty years later, a different and upgraded variation of X-wing, the T-70, was used by the Resistance, whereas a more advanced model, the T-85, was used by the New Republic Defense Fleet.
|

